→ Automatically resolving git merge conflicts in Xcode’s project.pbxproj file 🔗
Instead of faithfully merging your Xcode Project files by hand, tell Git what to do with them.
Map, filter and reduce in Swift
Having worked with Swift full-time for over half a year, I feel that now is a good time to start sharing bits and pieces on how to write Swift code instead of Objective-C code that happens to be syntactically correct Swift.
We'll start off easy today with an overview of map, filter and reduce, three nifty little methods that greatly reduce the amount of for-loops we write from day to day in Swift.
Having mentioned for-loops, you probably already guessed that map, filter and reduce can be used to perform operations on collections. Let's have a look at how these functions behave on a very simple collection: an array with elements of type T.
To start off our example, let's define an array of integers:
let numbers = [1, 2, 3, 4, 5]
Map
map can be used to transform a collection. It takes a function t: T -> U and returns a collection containing the results of calling t on each element of the collection. We could use this method to multiply all elements in our array by 2:
let multipliedNumbers = numbers.map { elem in
  return elem * 2
}
// multipliedNumbers = [2, 4, 6, 8, 10]
Using Swift's syntactical sugar, we can make a few optimizations here. First of all, the parameter that is passed to the function t can be referred to with the shorthand syntax $0. Second, since t only consists of a single line, we can omit the return statement, yielding the following one-liner:
let multipliedNumbers2 = numbers.map { $0 * 2 }
The full signature of the map function is: map(t: T -> U) -> [U]. Note that the type of the resulting collection is not equal to the type of the collection it received as input. So rather than transforming integers into integers as we did in our example, we could transform them into any other type.
Filter
filter can be used to filter elements out of a collection depending on a condition. It takes a function i: T -> Bool and returns a collection containing those results in the original collection for which i returns true. Hence, the full signature of the filter function is: filter(i: T -> Bool) -> [T].
Now, let's use that to filter our collection by keeping only the even numbers:
let evenNumbers = numbers.filter { $0 % 2 == 0 }
// evenNumbers = [2, 4]
Reduce
With the reduce method, all values in a collection can be combined into a single value. The function takes two parameters: the initial value i: U and a function c: (U, T) -> U that takes the accumulated value and an element of the collection as a parameter. The full signature of the reduce method is: reduce(i: U, c: (U, T) -> U) -> U.
Let's use this method to calculate the sum of all elements in our array of numbers:
let sum = numbers.reduce(0) { $0 + $1 }
// sum = 15
It may not be immediately clear what is happening here, so let's look at the first two iterations. At the first pass, c is called with the initial value 0 and the first element of the array (1) as parameters. By definition, it calculates the sum of these 2: 0 + 1 = 1 which is then passed on to the next iteration. In this next iteration, c will again be executed, this time with the accumulated value (1) and the second element (2) as parameters, returning the sum: 1 + 1 = 2. This procedure continues until the last element of the array is reached, at which point the accumulated value will simply be returned.
Chaining the methods together
The full power of map, filter and reduce becomes especially apparent when these methods are chained together. Have a look at the following example:
let someNumbers = [1, 2, 3, 4, 5]
let result = someNumbers.filter {
  $0 % 2 == 0
}.map {
  $0 + 10
}.reduce(0) {
  $0 + $1
}
Here we remove the odd numbers from the array with filter. Then, we offset each of them by 10 and calculate the sum of all elements. Verify for yourself that, after executing these chain of methods, result should be set to 26.
That's it for today! Stay tuned for more Swifty bits and pieces.
Solving UI lag in Yosemite
After using Yosemite for a couple of hours on end, the system usually gets very slow. Especially User Interface transitions and animations (such as when opening Expose) become choppy and take longer to perform than they should. It seems that the Window Server is the cause for this problem, as it shows very high CPU activity whenever the problem occurs.
I used to resolve this issue with a reboot, but this is not really convenient. It turns out that simply killing the WindowServer process from the command line is sufficient:
sudo pkill -9 "WindowServer"
The system will bounce you back to the login screen and after logging in everything will be running smoothly again.
→ Synx 🔗
A command-line tool that reorganizes your Xcode project folder to match your Xcode groups.
→ Design explosions 🔗
Jon Bell and William Van Hecke have started a blog in which they review UX designs in the wild with the purpose of learning from them. Their first episode takes apart Apple Maps and Google Maps on iOS, highlighting the differences and trying to understand the choices.
In their own words:
But this is a different kind of post. There’s no winner this time, just a bunch of design lessons inspired from studying two similar products. It’s fun to compare and contrast the approaches of two highly skilled teams working on a pretty unique design challenge.
...
Every decision has a tradeoff. Every thing you make easier can make another thing harder. There is no such thing as “the right design”. But we can learn a lot from seeing how experts in their field weighed the pros and cons of different approaches.
→ Anatomy of a feature: Push notifications 🔗
I love this quote by Soroush Khanlou:
At each layer of abstraction, we push down the complexity into another abstraction until the thing is so simple that it can be understood by glancing at it.
I believe it's what all programmers should strive for. Everything else will follow naturally.
→ The Design of Types 🔗
Wouter Swierstra, on how to let the compiler work for you:
This blog post aims to explain the way I think about enumerations (and a few other Swift types), which may differ from the intuitions developers coming from Objective-C have.
...
Years of Haskell programming have warped my brain in interesting ways. One important lesson I've learned is that designing the right types for your problem is a great way to help the compiler debug your program.
Custom curve UIView animations
I generally favour using the block based view animation methods defined on UIView over Core Animation for several reasons. Most importantly, I think that the syntax of these methods is more concise than first defining an animation object instance, then setting all properties and finally adding the animation object instance to the layer of the view that we want to animate.
However, there are some situations where the API exposed by these methods is not sufficient, such as the desire for an animation curve other than the predefined UIViewAnimationOption curves. Luckily, Apple also provides a CADisplayLink class that allows us to synchronise the execution of code with the refresh rate of the screen.
In this post, I’d like to share a convenience method that I created recently in a category on UIView[^1]. With this convenience method, a property of a view can be animated with a custom animation curve. I will first discuss the building blocks of the convenience method and then give an example application.
Building blocks
To make the convenience method work, there are several building blocks that need to be implemented. First of all, we need to find a way to encode the desired animation curve, and retrieve its value at a specific point in time. While Apple's CAMediaTimingFunction class allows us to do the first, it offers no method to evaluate the function described by the curve for a certain input value. Therefore, for my implementation I resorted to GNUstep QuartzCore's CAMediaTimingFunction class, which clones Apple's CAMediaTimingFunction implementation. To avoid naming conflicts, I renamed this class to GSQMediaTimingFunction and extended its public interface to expose the method - (CGFloat)evaluateYAtX:(CGFloat)x.
The second building block, LLTimedAnimation, sets up and manages a display-link based animation. The class is initialised as follows:
- (instancetype)initWithMediaTimingFunction:(GSQMediaTimingFunction *)timingFunction duration:(CGFloat)duration animationStateForProgress:(void(^)(CGFloat progress))animationStateForProgress completion:(void (^)(void))completion
{
    self = [super init];

    if (self) {
        self.duration = duration;
        self.timingFunction = timingFunction;
        self.animationStateForProgress = animationStateForProgress;
        self.completion = completion;
    }
    return self;
}
After initialisation, our LLTimedAnimation instance is set up with the duration of the animation, the timing function to use to calculate the progress, a completion block and, most importantly, a block animationStateForProgress which will be called whenever the CADisplayLink fires. As a parameter, this block takes the animation's progress normalised to a value in the range {0,1}. Note that at any intermediary point in time, the actual value may lay outside this range if some of the parameters passed to GSQMediaTimingFunction's + (id) functionWithControlPoints: are smaller than 0 or greater than 1. However, as per Apple's documentation, the start and end values are guaranteed to be 0 and 1 respectively.
The LLTimedAnimation can be started by calling the begin method on an instance:
- (void)begin
{
    CADisplayLink *displayLink = [CADisplayLink displayLinkWithTarget:self selector:@selector(performAnimationFrame:)];
    [displayLink addToRunLoop:[NSRunLoop mainRunLoop] forMode:NSRunLoopCommonModes];
}
Upon calling this method a CADisplayLink is set up with the LLTimedAnimation instance as target; ensuring that whenever the display link fires, the method performAnimationFrame: will be called with the display link as parameter. The display link is then addeed to the main run loop. Since the display link retains its target, the LLTimedAnimation instance will be kept in memory as long as the display link is attached to the run loop.
The final building block is the performAnimationFrame: method. The task of this method is straightforward; it uses the timestamp of the display link to calculate the progress of the animation with respect to its total duration and then calls evaluateYAtX: on the media timing function to get the actual progress value according to the curve defined earlier. If the time spent within the animation is greater than or equal to the allotted duration, the progress is set to 1.0 to ensure a clean end state. This is required since this method may get called sligthly later than the actual end time due to the nature of a display link.
The block stored in self.animationStateForProgress upon initialization is then called with the calculated progress value as a parameter. Finally, if the defined animation duration has finished, and therefore the animation has completed, we remove the display link from the run loop and call the completion block. Note that by removing the display link from the run loop, the class cluster consisting of the CADisplayLink and LLTimedAnimation instance is cleaned up.
- (void)performAnimationFrame:(CADisplayLink *)sender
{
    CGFloat durationDone = 0;
    CGFloat progress;

    if (sender) {
        if (self.beginTime && self.beginTime != 0) {
            durationDone = (sender.timestamp - self.beginTime);
        } else {
            self.beginTime = sender.timestamp;
        }

        if (self.duration > 0) {
            progress = [self.timingFunction evaluateYAtX:durationDone/self.duration];
        } else {
            progress = 1.0;
        }
    } else {
        progress = 1.0;
    }

    if (durationDone >= self.duration) {
        // Make sure the end state is 'clean'
        progress = MAX(progress, 1.0);
    }

    self.animationStateForProgress(progress);

    if (durationDone >= self.duration) {
        [sender removeFromRunLoop:[NSRunLoop mainRunLoop] forMode:NSRunLoopCommonModes];
        if (self.completion) {
            self.completion();
        }
    }
}
Example application
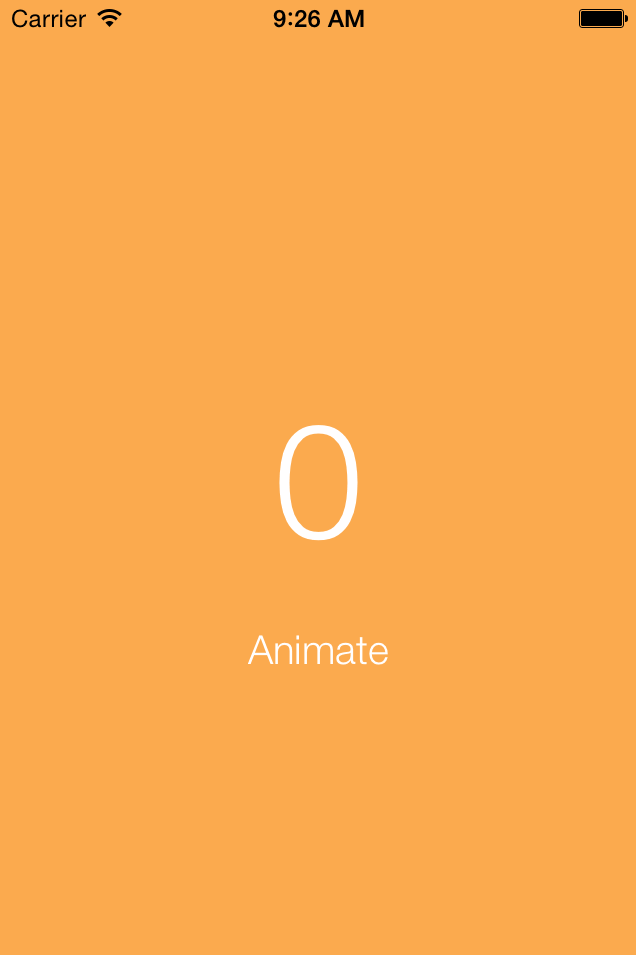
As an example application, consider a label that may contain a numeric value only. Whenever we set a new value for the label, we do not want the label to update instantly, but rather want it to count toward it's final value starting from it's current value. Using our category as defined above, we can easily achieve such an effect.
First of all, we create a class LLCountingLabel which subclasses UILabel. The label defines a property currentValue that is initialized to have the value 0:
- (instancetype)init
{
    self = [super init];
    if (self) {
        _currentValue = 0;
    }
    return self;
}
Furthermore, we define a method - (void)setCounter:(NSUInteger)newCounterValue in the public interface of our class, and in its implementation, we calculate the difference between the current value of the label and it's new value. We then call our convenience method on UIView and in the animationStateForProgress callback block, we calculate the value of the label relative to the progress of the animation and set this value as the text of the label.
- (void)setCounter:(NSInteger)newCounterValue
{
    NSInteger valueAtStart = self.currentValue;
    NSInteger diff = newCounterValue - valueAtStart;

    @weakify(self);
    [UIView animateWithMediaTimingFunction:[GSQMediaTimingFunction functionWithName:kCAMediaTimingFunctionEaseInEaseOut] duration:1.0f animationStateForProgress:^(CGFloat progress) {

        @strongify(self);
        if (! self) {
            return;
        }

        NSInteger valueForProgress = valueAtStart + (diff * progress);
        self.currentValue = valueForProgress;
        [self setText:[NSString stringWithFormat:@"%@", @(valueForProgress)]];

    } completion:nil];
}
Since the animationStateForProgress callback block is called whenever the screen refreshes, the value of the label is updated for every frame that is rendered. The result is as shown above. The code for the example is available on Github.
[^1]:
I started writing this post in February, but never got to finish it up until now. Meanwhile, Facebook released their awesome POP Animation Framework, which contains a POPCustomAnimation class that is very similar to what I'll describe in this post. I still think, though, that this post is a nice illustration of how to simplify animation code.
FMICS paper accepted
While I started studying Computer Science out of an interest in programming, over the course of the years I became more and more interested in its more theoretical and formal aspects. For this reason, I decided to enroll in the Formal Methods for Software Verification program at the Vrije Universiteit Amsterdam, which focuses on how to apply formal methods to verify the correctness of complex software systems.
For my Master Thesis, I specified an extension to the TCP Protocol in a formal language and verified that its behaviour is correct. After I graduated from university in 2013, my supervisors encouraged and helped me to create a paper out of this thesis, which we subsequently submitted for the 2014 edition of the conference on Formal Methods for Industry Critical Systems.
Earlier in June, we received confirmation that our submission was accepted and we have just submitted the final version to the conference. For reference, a manuscript of the paper can be found here. The final, published version can be obtained from Springer.